Saturday, June 25, 2011

Depth of Field Photography Tips


Some of the most essential photography tips for managing the “look” of your images center around choosing proper depth of field. In this article, we’re going to take a look at a few photography tips to help you control the depth of field in your photographs and the effects that it can have.

What is depth of field?
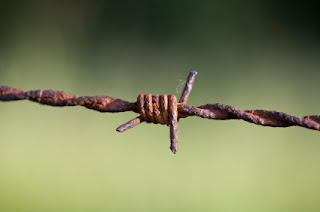
When you’re attempting to draw your viewer’s eye to your subject, composition is perhaps the single most important element. However, choosing a suitable depth of field is also a very powerful way to center your viewer’s focus on certain aspects within your image while making others less engaging. Think of the depth of field as a line of sight extending from your eye all the way through to the far reaches of your composition. This is “depth”. What we manipulate with depth of field is which elements of that composition are in focus and which are not.

Levels of depth
As we discuss photography tips for managing depth of field, it’s also important to understand its spectrum. When we refer to a shallow depth of field, we’re alluding to a primary subject (most often in our foreground) which is in focus while the rest of the composition is not. To the contrary, a deep depth of field typically refers to a composition in which all elements from the foreground to the background of the image are in focus.

Photography tips for controlling depth of field
Before we talk about how to control and manage depth of field in your images, let’s look at the functional elements of your camera that contribute to it. The camera’s aperture, or f stop, setting is the most important determining factor in arranging depth of field in an image. When we widen the aperture by using a smaller f stop setting, we allow a greater amount of light into the lens and thereby shallow the depth of field. This sharpens the focus on the subject within the composition in the foreground while blurring the background. Alternatively, closing down your aperture will increase focus throughout the entire composition from front to back. <<Read Full Article>>

Friday, June 17, 2011

Tips for Silhouettes Photogpraphy

Another great technique in photography is the Silhouettes. Silhouettes in photography terms refers to a photo that the subject appears to be a dark outline against a light background.

Here are the good tips that I found at www.howtophotography.org:


Photography Tips for Great Silhouettes


One of the most powerful techniques for framing a subject and focusing on its primary elements is the use of silhouettes and in this article, we’ll explore a few photography tips for creating engaging outlines.

Proper silhouette technique can be an incredibly powerful addition to the amateur photographers arsenal as nearly any subject can be framed using this method and the photography tips which are necessary to capture great silhouettes are probably already within your repertoire.

What Is a Silhouette?
Within the field of photography, we use the term silhouette to refer to framing your subject and utilizing lighting techniques so that the subject appears as a dark outline against a light backdrop. Most often, natural lighting is used to frame silhouettes, with outdoor sunlight being the perfect light source to set up the scene.

Light Levels Are Critical
When you choose to frame a subject as a silhouette, the most critical of photography tips we can offer is that your lighting levels on the subject and background are paramount. In order to create a great silhouette, it is necessary to ensure that the subject is receiving very limited light. This can be achieved by positioning your subject in a shaded area or out of the range of direct sunlight. You also want to make sure you’re working with the softer lighting of the early dawn hours or near dusk as bright mid-day sun can make it difficult to achieve low lighting on your subject. <<READ FULL ARTICLE>>

Tuesday, June 14, 2011

How to Photograph Smoke

Smoke is another good subject especially if you are into abstract photography or just making it as additional effect for the subject of your photos. 

There are thousands of "how to's" article and video tutorial in smoke photography in the internet that you can follow, just ask uncle Google and he will answer you with thousands of links to follow. 

This article is from sublime-light.com:

The first tutorial to be featured on the Sublime Light is on how to photograph smoke photographs. Photos of smoke are amazingly beautiful, extremely easy to take, and can really take on some interesting shapes. Everyone who looks at a smoke picture sees something different, which is one of the best parts. Where one person will see an angel, another will see a demon. This is a great way to get creative with photography without a lot of equipment commitment.
I’ll show you step by step how to photograph smoke, then how to process the pictures using Photoshop to really make them stand out. So enough already, let’s get started!
Here’s what you’ll need:
  • A digital SLR camera capable of firing an off camera flash using a PC connection or a hot shoe cord.
  • An off camera flash. This can either be a full studio strobe, or as simple as a battery operated flash connected to the camera using a cable.
  • A black background. This can be as simple as a black coat draped over the back of a chair.
  • Some incense. Incense gives off the nice thick smoke needed to make these images.
  • An image processing application such as Adobe Photoshop. Other applications will work as well, though I won’t give you directions on how to use those. One popular free application is Gimp.
Set up your incense a couple feet in front of the black background, and your camera directly across from that. Then set up your flash directly to the side of the incense so that the light hits it at a 90 degree angle to the camera’s view. Make sure the flash isn’t pointing at the background and it’s not pointing back at the camera. This will cause the background to light up, or will cause flare in the picture. If needed, you can put a home made snoot around the flash to keep the light from spilling away from the smoke. Here’s what it should look like: <<Read full article>>

Monday, June 13, 2011

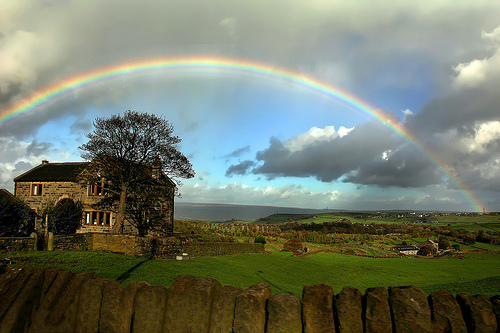
How To Photograph A Rainbow

Ever wonder how you could take a nice photograph of a rainbow? Following the photography tips from Darren Rowse will give us a good result.

Find a Rainbow
This is the most obvious but also perhaps the hardest part of the process. Their appearance will depend upon the conditions and they are something that will often happen completely out of the blue. Having said this – you should especially be on the look out for rainbows when you have two elements present – falling/spraying water droplets and bright sunlight. As a result they’re common when a storm is approaching and around waterfalls/sprinklers/fountains.

Backgrounds

As rainbows are not solid objects one of the keys to photographing them is to capture them in front of a background that allows them to stand out as much as possible. Ideally you’ll want to get a background that is uncluttered and if possible one that has darker colors (think dark clouds, mountains etc). While it’s not always possible to change the background – you might find that you’re able to change the angle that you’re shooting from or to focus just upon part of the rainbow that is in front of a good background. <<Read full article>>


Thursday, June 9, 2011

Small Lightning Big Results


We’ve all heard it, the question that has haunted mans inner paranoia for centuries, the question that photographers ponder everyday, shoot to shoot…does size matter? I’m talking about lighting size and needs. Many factors go into play when trying to choose a light source for your shoot and knowing which one to use and when to use it will prove to be advantageous when clients start searching for skilled photographers. For many photographers the thought of using anything other than their tride and true studio lights is out of the question but knowing how to properly utilize small light, how to shape and augment them in anyway possible to fit your scene can present major lighting advantages for future work.

As you start to explore and experiment with all the options presented to you, finding the right light becomes less of a chore and thanks to the many technological leaps in industry integrating both systems into your jobs becomes a smooth and seamless transition.

Location or studio? Are you traveling? Does the airline have weight restrictions? Portraits or products? Do you need a modeling light? Do you need battery longevity? What modifiers will you need? What’s your budget? What’s the finaloutput? What’s the mood you want to convey? Taking that first step is always tough however, making a point to get in the habit of asking these simple questions days before the shoot will not only save you time but lots of headache when you’re faced with the pressures of the job at hand. <<Continue...>>

11 Tips For Capturing Spring(E-System)

Larry Price gives us his 11 tips on how to capture photographs for the spring. Details on each tips can be found here.
  1. Assemble your spring gear.
  2. Work the light. 
  3. Think new life. 
  4. Get the low down. 
  5. Look up.
  6. Walk in the rain. 
  7. Control the chaos. 
  8. Use wide apertures.
  9. Hold on. 
  10. Pack for the road. 
  11. Dress for the season. 

6 Ways to Capture More Unique Travel Photos

By Neil Ta
digital-photography-school.com


There’s something to be said about having a nice collection of travel photos. They document not only your personal journey in other cities and countries, but also showcase the artistic side of your photographic abilities. Throughout my recent travels through Southeast Asia (and many smaller trips in years past), I’ve been able to capture some images that I’m quite proud of. The following tips have helped me take better and more unique photos when I am traveling or when I’m home:


1. Always Be Ready
2. Don’t Do What Others are Doing
3. Do Some Research & Make Connections
4. Take Risks
5. Get Off the Beaten Path
6. Take a Timeout

3 Stupidly Simple Reasons Why Most People’s Photography Does Not Improve

I’m presuming that this article will not apply to most of us… but after 3 conversations in the last week which revealed the same photography problems in 3 different people – I thought I’d better jot them down.

Warning: none of this is rocket science sometimes the basics need to be said!

1. You don’t Take Your Camera With You
2. You’re Going too Fast
3. You are Worried what Others Will Think

1. You don’t Take Your Camera With You
If you don’t practice using your camera you’re unlikely to ever grow in your understanding of and skill in photography and if you rarely have it with you – you’ll not get that practice.

Does that mean you need to lug your DSLR and all your cumbersome gear around with you all the time?
Maybe – I have friends who are never without their main camera – but if that’s just not practical, at least make sure you have a smaller point and shoot or even a decent camera phone with you at all times. While the quality of the images you take might not be as great with these cameras – at least you’ll be practicing your composition, thinking about light, color and other aspects of photography. Read the <<full article>>

Source: http://www.digital-photography-school.com by Darren Rowse